Toysdaily 玩具日報

 找回密碼
 註冊
查看: 53747|回復: 64

補水口, 補到嘔!!!! [MG] Unicorn Gundam Titanium Finish

[複製鏈接]
發表於 3-5-2009 22:57:56 | 顯示全部樓層 |閱讀模式
Bandai今次真係玩死人!
平時既Extra Finish MG / HG 無論係電鍍, pearl coating, 噴銀, 水口位點都有得救!
今次既 [MG] Unicorn Titanium Finish 既方法實在太特別,
半透明膠件用Aluminium電鍍銀之後, 噴上有鈦金屬成份既白色, 令膠件銀中帶白, 白中帶銀,
無一隻模型油 / marker可以重現呢一隻色!
相信各位大大都可能見過, 剪件之後係深深既灰色 :53:
真係唔知話bandai有心定係無意:62:, 不過, 既然買左總要試一試砌好佢...
廢話少講, 去相!


原來官圖係真既...真係可以影到閃閃下:52:
完全無用PS去加工都出都咁閃, Tatinium Finish 總算有個交代!


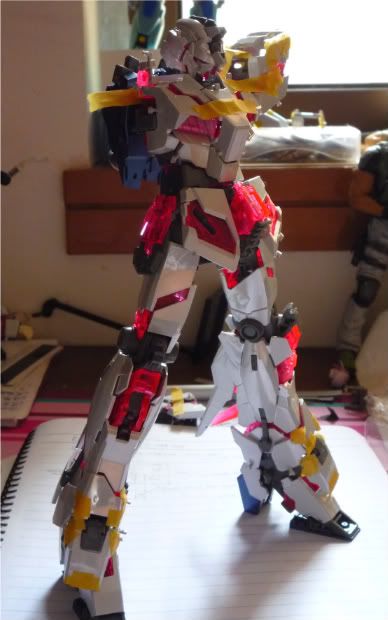
閃完, 睇返隻Unicorn Gundam真身, 可見白色既地方係"令"身既:


今次只係灰色地方噴左黑鐵色, 水口則用以下既野黎補:


Titanium Finish 由於係電鍍後噴上去, 件既側面 / 邊位可能會上唔到白色,
因此有部分邊位會程銀色狀態,
補水口既時候睇一睇水口位附近係銀色定係白色而選用Gundam Marker 白或銀去補, 乾後在用開淡既閃白甲油再上一次,
總算做都唔係太起眼...(大家覺得點?)

如果可以係補左既位加張水貼 / 刮貼應該會更加唔覺眼!
(:55:水貼已經買唔到....)


擺下action pose先! 由於噴左黑鐵色, (再加上Tatinium Finish 令部件厚左?),
差唔多可以話變唔返Unicorn mode, 所以只以NT-D mode示人, 請見諒...
(其實隻腳實到要變既話要拆開晒先拉得返舊紅色野出黎....同埋好易刮甩Tatinium...)


果然係Ver. Ka, 可動性"一流"!!! :53:
連雙手拎劍同拓起支砲都好牽強...
都係齋企display最靚....

走甩左一粒水口未補添(左肩)....各位可以睇睇灰黑色既水口有幾嘔血!

白件都幾"令"身, 開部Playstation出紅色畫面照落去隻unicorn都反光反得到,
仲岩岩好就到隻眼反光:52:


最後送上PS圖一張:


技術有限, 做得唔好既地方有好多,  多多指教 :64::64:

Bandai明知(?)好多隻賣得既MG/HG都會出Extra Finish,
諗極都唔明點解唔預先做做under-gate (隱藏水口)
抵鬧! 白色裝甲既水口加埋加埋分分鐘有一百個, 就算補都補到死死下, 又唔磨得, 一磨又見黑色:72:
(出黑Unicorn真係要諗諗仲會唔會買...)
不過, 今次隻Tatinium Finish確實幾靚, 希望下次用既時候會從玩家角度去考慮一下....

謝謝觀賞!
發表於 3-5-2009 23:01:51 | 顯示全部樓層
正∼! 整得好正∼:71:
發表於 3-5-2009 23:05:28 | 顯示全部樓層
大大之前無睇過報告咩..?
真係估唔到仲有人會挑戰極限...:(
發表於 3-5-2009 23:30:22 | 顯示全部樓層
But it looks really so cooooooooooooool~~~
發表於 3-5-2009 23:33:52 | 顯示全部樓層
:71: 大大真的好有耐性~ 了不起!
發表於 3-5-2009 23:36:03 | 顯示全部樓層
真係強人....整完好型呀~
發表於 3-5-2009 23:37:38 | 顯示全部樓層
換著我一定開無視大法:( :43:
發表於 3-5-2009 23:41:06 | 顯示全部樓層
大大整得好好呀 ~ ~ !! 我有普通版已覺得 Unicon 可以和一隻 PG 比美麻煩度 !!
大大肯挑戰更麻煩的 TF 版更加一讚 ! :71:
發表於 3-5-2009 23:42:31 | 顯示全部樓層
:handshake: 做得好
發表於 3-5-2009 23:45:15 | 顯示全部樓層
:71: :71: :71:  Good. Thank you for sharing
發表於 4-5-2009 00:10:54 | 顯示全部樓層
Very good wor!! Great idea!!
發表於 4-5-2009 01:31:54 | 顯示全部樓層
thank you yui bigbig for finishing this tedious project!
the final outcome looks amazing, i think what you did with the cut marks
are really really well done, especially with some decals applied, the upper
body cut marks(chest, shoulders) are decent looking! but i dunno about the
forearms tho, cuz it didn't shown very clearly in the pic(perhaps you did it on
purpose hahah!?) ayw, i am still working on mine(very hard) and hv been trying
diff ways of dealing with the cut mark. very much like what you did, i tried the
silver plated gundam market, whitepearl and even went to (SASA) like you did,
to look for a decent pearl to match the titanium plating.
so seeing your post gave me strength to finish it(hopfully), and hope mine will
look as good as yours! thanks for the post


[ 本帖最後由 flash 於 4-5-2009 01:53 AM 編輯 ]
發表於 4-5-2009 02:03:58 | 顯示全部樓層
Nice work:71:
發表於 4-5-2009 03:11:11 | 顯示全部樓層
:64: :64: :64: :71: :71: :71:
發表於 4-5-2009 04:31:16 | 顯示全部樓層
The shiny effect can be done without photoshop??? :@  Very 灼眼~ :30:  :DD

But wow, I can't find the nub marks on it right now. So the trick behind it is to use white or silver Gundam marker (water based) and put some pearl white varnish to finish off? I might try that on my pearl white finish 1/144 Kampfer~

lol Sasa sticker on the nail varnish... :(

But really, good job as always like what you've done with your figma! I really admire your passion there! :71:
您需要登錄後才可以回帖 登錄 | 註冊

本版積分規則

Archiver|手機版|Toysdaily 玩具日報

GMT+8, 3-7-2024 11:29 AM , Processed in 0.038056 second(s), 20 queries .

Powered by Discuz! X3.4

Copyright © 2001-2021, Tencent Cloud.

快速回復 返回頂部 返回列表